Ubuntu 18桌面版本安装0.2.1 的一些问题

一个网友安装Ubuntu碰到这个问题卡住了

昨天参考的掘金网的贴文进行安装,碰到问题是Illegal instruction (core dumped),初步怀疑是显卡问题, 尝试了很久没有解决问题。也试了安装tensorflow。

今天重装了一下系统, 然后选择了官网的源代码开始安装
https://conflux-chain.github.io/conflux-doc/install/
其中碰到了2个问题值得注意:
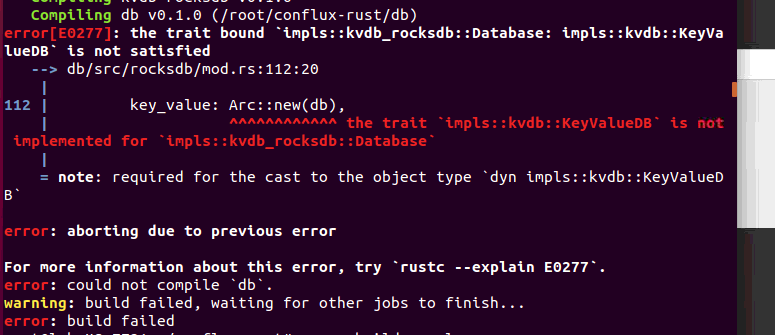
1.碰到db错误, 我们开始用的是官网的0.1.7, 后来查询到该版本有这个问题,随后切换到0.2.1


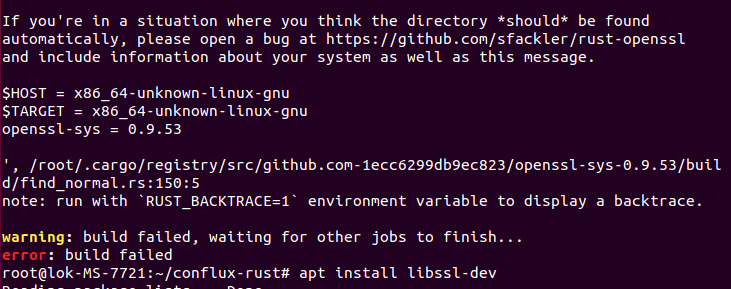
2.其次就是有一些依赖缺乏,根据提示安装即可。

总结, 其实安装过程还是比较消耗时间的, 如果有一些工具能让下载速度快一点会比较好, 整个安装差不多花了2个小时, 如果注意到上面的几点, 应该能再40分钟内搞定。

大家如果碰到Ubunt安装的问题可以在该贴文下面留言,如果解决不了,可以按照Teamviewer, 我们远程登录你电脑帮助解决。

Reference
https://juejin.im/post/5d103695f265da1bd260f70b#heading-17


https://conflux-chain.github.io/conflux-doc/install/
https://conflux-chain.github.io/conflux-doc/get_started/#running-conflux-full-node
Command
1 apt install vim
2 vim /usr/share/lightdm/lightdm.conf.d/50-unity-greeter.conf
3 cd /etc/pam.d
4 vim gdm-autologin
5 vim gdm-password
6 vim /root/.profile
7 vim /etc/gdm3/custom.conf
8 reboot
9 apt-get install clang
10 sudo vim /etc/apt/sources.list
11 sudo apt-get update
12 apt-get install clang
13 sudo apt install gdebi-core
14 wget https://download.teamviewer.com/download/linux/teamviewer_amd64.deb
15 sudo gdebi teamviewer_amd64.deb
16 cat /proc/version
17 uname -a
18 mkdir -p conflux
19 unzip conflux_ubuntu_v0.2.1.zip -d conflux && cd conflux/run
20 ./conflux --config default.toml
21 cd conflux
22 cd run
23 ./conflux --config default.toml
24 grep flags -m1 /proc/cpuinfo | cut -d “:” -f 2 | tr ‘[:upper:]’ ‘[:lower:]’ | { read FLAGS; OPT="-march=native"; for flag in $FLAGS; do case “$flag” in “sse4_1” | “sse4_2” | “ssse3” | “fma” | “cx16” | “popcnt” | “avx” | “avx2”) OPT+=" -m$flag";; esac; done; MODOPT=${OPT///.}; echo “$MODOPT”; }
25 ————————————————
26 版权声明:本文为CSDN博主「哪咔吗」的原创文章,遵循 CC 4.0 BY-SA 版权协议,转载请附上原文出处链接及本声明。
27 原文链接:https://blog.csdn.net/weixin_37340613/article/details/87102140grep flags -m1 /proc/cpuinfo | cut -d “:” -f 2 | tr ‘[:upper:]’ ‘[:lower:]’ | { read FLAGS; OPT="-march=native"; for flag in $FLAGS; do case “$flag” in “sse4_1” | “sse4_2” | “ssse3” | “fma” | “cx16” | “popcnt” | “avx” | “avx2”) OPT+=" -m$flag";; esac; done; MODOPT=${OPT//
/.}; echo “$MODOPT”; }
28 ————————————————
29 版权声明:本文为CSDN博主「哪咔吗」的原创文章,遵循 CC 4.0 BY-SA 版权协议,转载请附上原文出处链接及本声明。
30 原文链接:https://blog.csdn.net/weixin_37340613/article/details/87102140
31 gcc -march=native -Q --help=target|grep march
32 apt install gcc
33 gcc -march=native -Q --help=target|grep march
34 cat /proc/cpuinfo
35 grep flags / proc / cpuinfo
36 sudo pip install dlib
37 sudo apt update
38 sudo apt-get upgrade
39 pyhton --version
40 python --version
41 ./conflux --config default.toml
42 pip install --ignore-installed --upgrade “Download URL” --user
43 apt install python-pip
44 pip --version
45 pip install --ignore-installed --upgrade “Download URL” --user
46 pip install --ignore-installed --upgrade /path/to/binary.whl --user
47 pip install --ignore-installed --upgrade “https://github.com/fo40225/tensorflow-windows-wheel/blob/master/1.14.0/py37/CPU/sse2/tensorflow-1.14.0-cp37-cp37m-win_amd64.whl” --user
48 gcc --version
49 pip install --ignore-installed --upgrade “https://github.com/lakshayg/tensorflow-build-archived/releases/download/tf1.12.0-ubuntu18.04-py2-py3/tensorflow-1.12.0-cp27-cp27mu-linux_x86_64.whl” --user
50 pip install --ignore-installed --upgrade “https://github.com/lakshayg/tensorflow-build-archived/releases/download/tf-1.14-ubuntu18.04-py3.7/tensorflow-1.14.1-cp37-cp37m-linux_x86_64.whl” --user
51 pip install --ignore-installed --upgrade “https://github.com/lakshayg/tensorflow-build-archived/releases/download/tf1.9.0-ubuntu18.04-py36/tensorflow-1.9.0-cp36-cp36m-linux_x86_64.whl” --user
52 pip install --ignore-installed --upgrade “https://github.com/lakshayg/tensorflow-build-archived/releases/download/tf-2.1.0-py35-ubuntu1604/tensorflow-2.1.0-cp35-cp35m-linux_x86_64.whl” --user
53 pip install --ignore-installed --upgrade “https://github.com/lakshayg/tensorflow-build-archived/releases/download/tf1.12.0-ubuntu18.04-py2-py3/tensorflow-1.12.0-cp36-cp36m-linux_x86_64.whl” --user
54 pip install --ignore-installed --upgrade “https://github.com/lakshayg/tensorflow-build-archived/releases/download/tf1.12.0-ubuntu18.04-py2-py3/tensorflow-1.12.0-cp27-cp27mu-linux_x86_64.whl” --user
55 vim /etc/hosts
56 source /etc/profile
57 pip install --ignore-installed --upgrade “https://github.com/lakshayg/tensorflow-build-archived/releases/download/tf1.12.0-ubuntu18.04-py2-py3/tensorflow-1.12.0-cp27-cp27mu-linux_x86_64.whl” --user
58 export http_proxy=http://proxyAddress:port
59 source /etc/profile
60 pip install --ignore-installed --upgrade “https://github.com/lakshayg/tensorflow-build-archived/releases/download/tf1.12.0-ubuntu18.04-py2-py3/tensorflow-1.12.0-cp27-cp27mu-linux_x86_64.whl” --user
61 vim /etc/reslov.conf
62 vim /etc/resolv.conf
63 source /etc/profile
64 export GOPROXY=https://goproxy.io
65 source /etc/profile
66 pip install --ignore-installed --upgrade “https://github.com/lakshayg/tensorflow-build-archived/releases/download/tf1.12.0-ubuntu18.04-py2-py3/tensorflow-1.12.0-cp27-cp27mu-linux_x86_64.whl” --user
67 export GPPROXY=https://goproxy.io
68 source /etc/profile
69 pip install --ignore-installed --upgrade “https://github.com/lakshayg/tensorflow-build-archived/releases/download/tf1.12.0-ubuntu18.04-py2-py3/tensorflow-1.12.0-cp27-cp27mu-linux_x86_64.whl” --user
70 curl https://sh.rustup.rs -sSf | sh
71 apt install curl
72 curl https://sh.rustup.rs -sSf | sh
73 apt install curl
74 curl https://sh.rustup.rs -sSf | sh
75 sudo apt-get install clang libsqlite3-dev
76 sudo add-apt-repository ppa:ethereum/ethereum
77 export RUSTUP_DIST_SERVER=https://mirrors.ustc.edu.cn/rust-static
78 cd
79 export RUSTUP_DIST_SERVER=https://mirrors.ustc.edu.cn/rust-static
80 export RUSTUP_UPDATE_ROOT=https://mirrors.ustc.edu.cn/rust-static/rustup
81 source /etc/profile
82 curl https://mirrors.ustc.edu.cn/rust-static/rustup/rustup-init.sh | sh
83 rustc --version
84 cd conflux/run
85 ./conflux --config default.toml
86 cat /etc/issue
87 ./conflux --config default.toml
88 rust --version
89 apt install rust
90 cd
91 cd conflux
92 cd run
93 ./conflux --config default.toml
94 cd
95 cd conlux-rust
96 cd conflux-rust
97 cd run
98 …/target/release/conflux --config default.toml
99 cd
100 cd conflux/run
101 ll
102 …/target/release/conflux --config default.toml
103 vi default.toml
104 pwd
105 sudo apt install python-dev python-pip
106 pip install -U --user pip six numpy wheel setuptools mock future>=0.17.1
107 export GOPROXY=https://goproxy.io
108 source /etc/profile
109 $ curl https://sh.rustup.rs -sSf | sh
110 curl https://sh.rustup.rs -sSf | sh
111 sudo apt-get install clang libsqlite3-dev
112 ./dev-support/dep_pip3.sh
113 sudo add-apt-repository ppa:ethereum/ethereum
114 sudo apt-get update
115 sudo apt-get install solc
116 git clone https://github.com/Conflux-Chain/conflux-rust
117 apt install git
118 git clone https://github.com/Conflux-Chain/conflux-rust
119 cd conflux-rust
120 git checkout v0.2.1
121 cargo build --release
122 apt install cargo
123 cargo build --release
124 cd
125 curl https://sh.rustup.rs -sSf | sh
126 sudo apt-get install clang libsqlite3-dev
127 git clone https://github.com/Conflux-Chain/conflux-rust
128 cd conflux-rust
129 git checkout v0.1.7
130 cargo build --release
131 apt install cmake
132 cargo build --release
133 history

:+1:好文

Ubuntu系统运行conflux(先chmod 777 conflux过),执行./conflux --config default.toml --full 2>stderr.txt时,请问这是什么问题?!

执行这个,看看报什么错误
./conflux --config default.toml --full 2

一样的报错,权限不够。我在属性中沟上"可执行程序"但那个对沟被迅速撤销

后来我发现以上图片中出现的问题,运行的文件放在了Windows分区(我是双系统)。。。虽然Linux下看得到但权限是没有
于是把conflux文件夹移动到Ubuntu分区,但由于我系统版本是20.04版本,报错:核心已转储

于是我下载源代码编译启动的挖矿

试试这个
Conflux测试网挖矿教程0.5.1-alpha-4(友好版):
https://juejin.im/post/5d103695f265da1bd260f70b

我这个就是描述在0.5.1-alpha-4(友好版)这个版本发生的情况:后来我发现以上图片中出现的问题,运行的文件放在了Windows分区(我是双系统)。。。虽然Linux下看得到但权限是没有
于是把conflux文件夹移动到Ubuntu分区,但由于我系统版本是20.04版本,报错:核心已转储

你可以安装一个teamviewer, 加我微信 1725325128, 我远处到你电脑看看。