
This guide is separated into 6 parts:
- Preparation — Obtaining a Public Wallet Address
- Install Conflux Network on Windows
- Install Conflux Network on Mac
- Install Conflux Network on Linux
- Synchronizing the latest code from the testnet
- Mining Log Infoset
- Conflux Network Mainnet Phase I - Pontus was officially launched on the 27th of April 2020, current version: v0.6.0-rc-3
- Conflux’ current Testnet is called “Conflux Testnet”, current Version: v0.6.0-rc-3. All data on Conflux Testnet are testnet data
- Conflux Bounty Program was launched in August 2019. The Bounty Program will have a series of tasks in order to obtain FanCoins (FC), which can be swapped to the Conflux Network Mainnet Token CFX on a 1:1 ration once the final mainnet is launched
- Conflux Testnet is in a stable version. The necessary files for mining on different operating systems can be found on Github. This guide targets everyone, even without prior coding knowledge.
!!! Important notice!!!
Conflux Network has updated the wallet creation rules so that all normal wallet addresses start with “0x1" and all smart contract wallet addresses start with “0x8”. The first character of a normal wallet address after the prefix “0x” is now automatically changed to “1”, this does not affect your private key! For example, if your normal wallet address was ‘0x7b5….’, after the current update, your normal wallet address is now changed to ‘0x1b5c…’. Please be aware of the change since the update when transferring CFX or FC!
1. Preparation — Obtaining a Public Wallet Address
Since web wallets contain security risks, we recommend using ConfluxPortal. ConfluxPortal is a browser extension to access Conflux Network Ecosystem DApps from your preferred browser.
2. Install Conflux Network on Windows
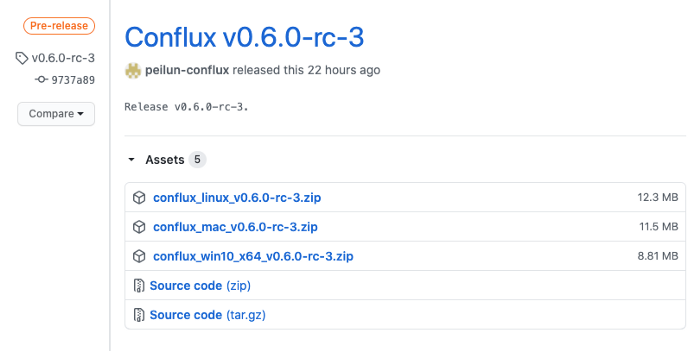
Download the latest release of the testnet
Click here to find the latest release of the testnet. Click on Assets and download the version for your OS. (Current latest version: 0.6.0-rc-3)
Preparations:
Extract downloaded file
- Open up: C-Drive → User →
- Create Folder: conflux
- Extract downloaded file into the newly created folder: conflux
 The directory structure should be as such:
conflux
 └── run
      ├── conflux
      ├── default.toml
      └── log.yaml
Configurations:
- Modify Configurations
Open up: C-Drive → User → → conflux → run
Opendefault.tomlusing the notepad software, and:
- Configure the code line
start_mining=trueto enable mining:
Remove the “#” at the beginning of this line to enable mining.

- Configure the code line
mining_authorto receive your mining rewards:
Remove the 0x prefix when entering your wallet adress. Find your account address under “Address” in your Conflux wallet.
For example, if the account address is
0x14aa17059a0f2dbf539d1cdec662177af963a078,
the final configuration should be:
mining_author=”14aa17059a0f2dbf539d1cdec662177af963a078”
Remove the “#” at the beginning of this line.

- Configure your public_address by replacing the xx.xx.xx.xx with your public IP address:

Add “:32323” at the end of your IP address. The final result should be in this format: xx.xx.xx.xx:32323.
To obtain your IP address, just search for “IP” on Google as seen in the figure below:
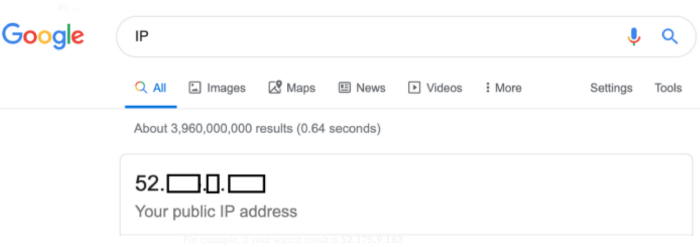
For example, if your search result is 52.175.9.183
then your final configuration should be 52.175.9.183:32323
- Save the changes you made and exit
Start mining:
- Press the “Start” button
- Search for
cmdand open it - Copy the following code into the
cmdwindow, and press “Enter”:
cd conflux\run
- Copy the following code into the
cmdwindow, and press “Enter”:
conflux --config default.toml --full 2>stderr.txt
Stop mining:
- Click on the opened
cmdwindow and press Ctrl+C, or - Directly close the
cmdwindow, or - Open task manager: detail information — find conflux, select it and end process
3. Install Conflux Network on Mac
Download the latest release of the testnet
Click here to find the latest release of the testnet. Click on Assets and download the version for your OS. (Current latest version: 0.6.0-rc-3)
Preparations:
There are three basic requisites for easy mining on Mac:
Basic Requisite 1: The downloaded latest release of the testnet is in the Downloads folder of your Mac
Basic Requisite 2: The file of the latest release of the testnet is called “conflux_mac_v0.6.0-rc-3”
Basic Requisite 3: The downloaded “conflux_mac_v0.6.0-rc-3” file will extract into a folder called run. To simplify the file management: create a conflux folder and move the run folder into it.
The directory structure should be as such:
conflux
└── run
     ├── conflux.exe
     ├── default.toml
     ├── log.yaml
     └── throttling.toml
Notice: The following commands only apply if the three basic guidelines are fulfilled!
- Download latest release of the testnet is in the Downloads folder of your Mac
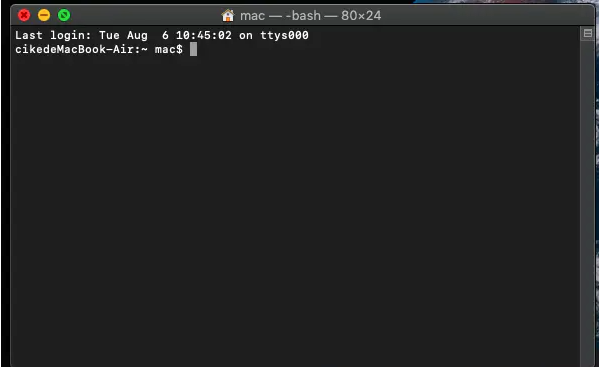
- Open Terminal on your Mac (Click: Command + Enter; Type in “Terminal”; Press Enter)
- Copy the following lines of code into the `Terminal`` window, and press “Enter”:
cd ~/Downloads && mkdir -p conflux

unzip conflux_mac_v0.6.0-rc-3.zip -d conflux

cd conflux/run
Code Explanation
- Go into the Downloads folder and create a conflux folder (Basic Requisit 1)
- Unzip the downloaded latest release of the testnet into the conflux folder (Basic Requisit 2-3)
- change directory
This way you will have a new folder in your native Downloads folder called “conflux”. And in the new “conflux” folder is a folder called “run”. The directory structure is:
Downloads
   └──conflux
        └──run
            ├── conflux
            ├── default.toml
            ├── log.yaml
            └── throttling.toml
Configurations:
- Modify Configurations
Open up: Finder → Downloads → conflux → run → default.toml
Open default.toml using the notepad software, and:
- Configure the code line ·start_mining=true· to enable mining:
Remove the “#” at the beginning of this line to enable mining.
- Configure the code line
mining_authorto receive your mining rewards:
Remove the 0x prefix when entering your wallet adress. Find your account address under “Address” in your Conflux wallet.
For example, if the account address is
0x14aa17059a0f2dbf539d1cdec662177af963a078,
the final configuration should be:
mining_author=”14aa17059a0f2dbf539d1cdec662177af963a078”
Remove the “#” at the beginning of this line.
- Configure your public_address by replacing the xx.xx.xx.xx with your public IP address:
Add “:32323” at the end of your IP address. The final result should be in this format: xx.xx.xx.xx:32323.
To obtain your IP address, just search for “IP” on Google as seen in the figure below:
For example, if your search result is 52.175.9.183
then your final configuration should be 52.175.9.183:32323
- Save the changes you made and exit
Start mining:
- Open Terminal on your Mac (Click: Command + Enter; Type in “Terminal”; Press Enter)
- Copy the following lines:
cd ~/Downloads/conflux/run

ulimit -n 10000

./conflux --config default.toml
Insert the copied lines into Terminal, and press “Enter”:
![]()
If you extracted the latest testnet release elsewhere, please adjust accordingly!
For example, you extracted the latest release on your Desktop (without and extra configuration), then adjust your terminal input to:
cd ~/Desktop/run./conflux --config default.toml
Stop mining:
- Open Terminal on your Mac (Click: Command + Enter; Type in “Terminal”; Press Enter)
- Press: Contol + C, or
- Close the Terminal window
4. Install Conflux Network on Windows
Download the latest release of the testnet:
Click here to find the latest release of the testnet. Click on Assets and download the version for your OS. (Current latest version: 0.6.0-rc-3)
Preparations:
Extract downloaded file
- Extract the downloaded latest release of the testnet
- Open Terminal
- Copy the following line into Terminal and press “Enter”
mkdir -p conflux
- Copy the following lines into Terminal and press “Enter”
unzip conflux_linux_v0.6.0-rc-3

-d conflux && cd conflux/run
The directory structure should be as such:
conflux
   └── run
        ├── conflux
        ├── default.toml
        ├── log.toml
        └── throttling.yaml
Configurations:
- Modify Configurations
Open up: Finder → Downloads → conflux → run → default.toml
Open default.toml using the notepad software, and:
- Configure the code line
start_mining=trueto enable mining:
Remove the “#” at the beginning of this line to enable mining.
- Configure the code line
mining_authorto receive your mining rewards:
Remove the 0x prefix when entering your wallet adress. Find your account address under “Address” in your Conflux wallet.
For example, if the account address is
0x14aa17059a0f2dbf539d1cdec662177af963a078,
the final configuration should be:
mining_author=”14aa17059a0f2dbf539d1cdec662177af963a078”
Remove the “#” at the beginning of this line.
- Configure your public_address by replacing the xx.xx.xx.xx with your public IP address:
Add “:32323” at the end of your IP address. The final result should be in this format: xx.xx.xx.xx:32323.
To obtain your IP address, just search for “IP” on Google as seen in the figure below:
For example, if your search result is 52.175.9.183
then your final configuration should be 52.175.9.183:32323
- Save the changes you made and exit
Start mining:
./conflux --config default.toml --full 2>stderr.txt
5.Synchronizing the latest code from the testnet
Please check the latest version of the Testnet first →(github.com/Conflux-Chain)
1.Delete the old local file
Find the folder “conflux”, delete all files under the category “run”.
2. Get the latest pre-build executable package
- Go to github.com/Conflux-Chain and download the latest release package for your OS, current version: v0.6.0-rc-3
- Extract files
- Copy the
confluxfile and replace with the previous one - Properly check the configuration of
default.toml, especially: public_address, start_mining=ture, and mining_author.
3. Run Conflux
cd run

- Mac / Linux:  ./conflux --config default.toml 2>stderr.txt

- Windows:    conflux --config default.toml 2>stderr.txt
6. Mining Log Infoset
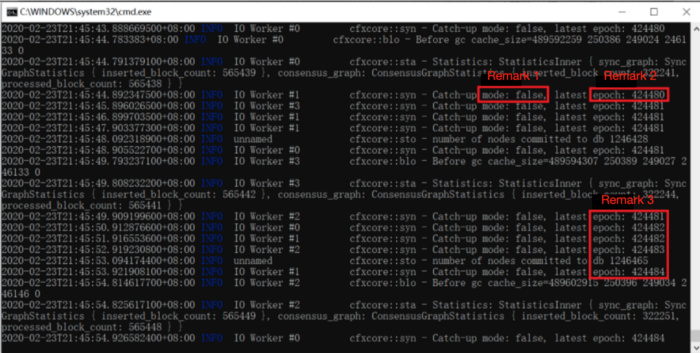
1) Statistics: StatisticsInner { sync_graph: SyncGraphStatistics { inserted_block_count: xxx }, consensus_graph: ConsensusGraphStatistics { inserted_block_count: yyy, processed_block_count: yyy } }
- when xxx is increasing, it means that the block synchronization is working properly, especially when it’s the first time connecting
- Remark 1 - mode: false means that the network data catch-up synchronization process is completed and that mining is ongoing
- Remark 2 - epoch:424480 means that you are mining in the 424480th epoch
- Remark 3 - when the numbers behind the word epoch are increasing continuously, the mining process is on-going
Reference Link: here